butterfly_viewer
Download
·
Tutorial
·
GitHub↗
Butterfly Registrator↗
Sliding overlays¹
Synchronized pan and zoom¹
Butterfly Viewer is a desktop multi-image viewer with sliding overlays, synchronized pan and zoom, and other handy features to rapidly compare local image files. This can be useful for visually inspecting painting research data such as high-res and raking-light photos, X-rays, and element maps from XRF and RIS.
The Viewer runs as an installable Windows executable, a macOS app, or directly on its Python source code.
Supported filetypes include PNG, JPG/JPEG, TIF/TIFF, BMP, WEBP, SVG, ICO, and CUR.
Butterfly Registrator↗ can be used to create aligned copies of your images so you can more accurately compare them in the Viewer. The Registrator helps you align (or register) images to a given reference image such that their heights and widths match and the features within those images line up.
¹Small Pear Tree in Blossom by Vincent van Gogh. Credits: Van Gogh Museum, Amsterdam (Vincent van Gogh Foundation)
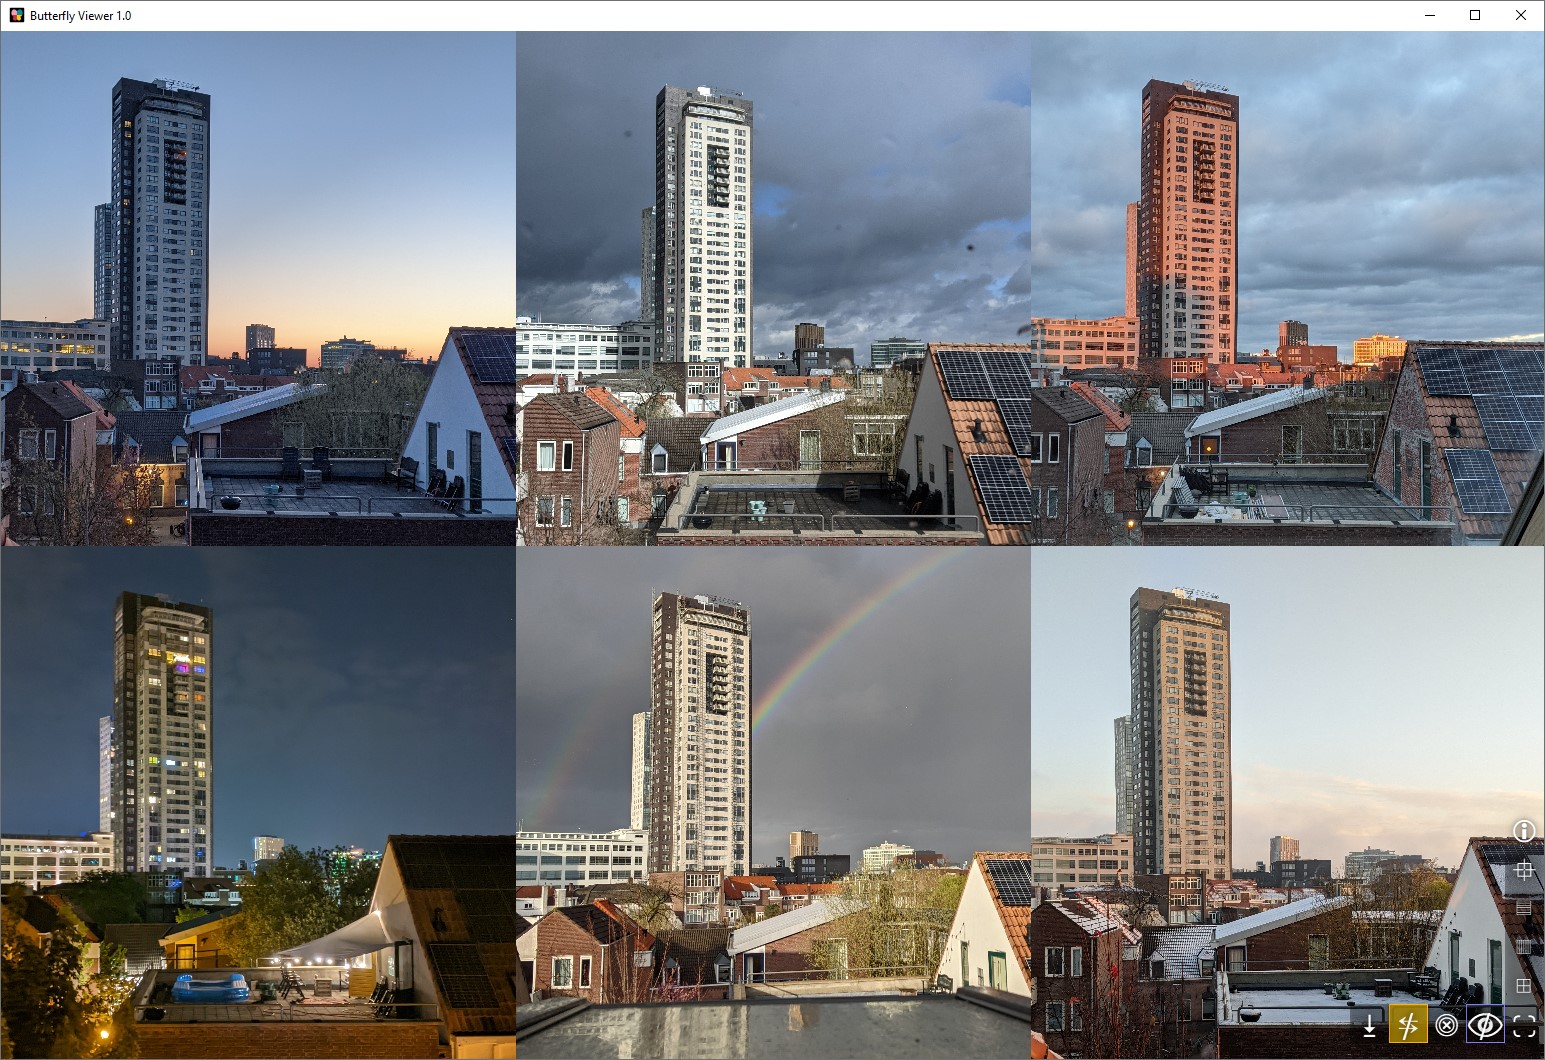
Auto-arranging side-by-side image windows
Download and install
You can download and install Butterfly Viewer to run:
- as a Windows executable;
- as a macOS app; or
- directly with Python.
Windows executable
Download:
butterfly_viewer_v1.y.z_win64_setup.exe.zip↗Restart recommended · 110 MB installed
For Windows, Butterfly Viewer installs to your computer with an executable (.exe) installer similar to how other programs install on your computer. The Viewer will be added to your list of programs and optionally to your desktop as a shortcut.
Here v1.0.0 is shown in the screenshots, but you should use the latest version unless advised otherwise.
Prerequisites
The Viewer uses 106 MB of storage space as an installed app.
The Viewer uses locally stored images (like PNG, JPEG, TIFF) to create and explore views of those images. It's designed to be navigated by mouse or trackpad by clicking, dragging, and dropping.
The Viewer doesn't use the internet, so any online images you wish to use must be locally available — for example, by downloading them or by selecting “always keep on your device” if they sync to cloud storage like OneDrive or Google Drive. Images on network shares can be loaded into the Viewer, but they can take more time to load than those stored locally, especially if accessing the share through a VPN.
Download ZIP
Download the Viewer from the latest release of the Viewer's GitHub repo, which is packaged as an installer under Assets as butterfly_viewer_v1.y.z_win64_setup.exe.zip↗.
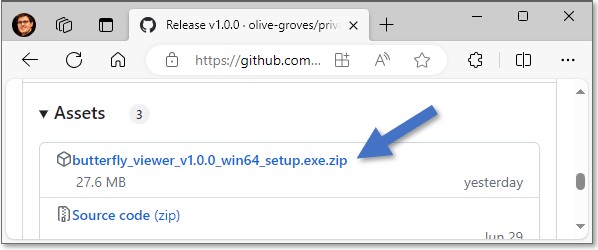
Here v1.1 is shown, but you should download the latest version.
Extract ZIP
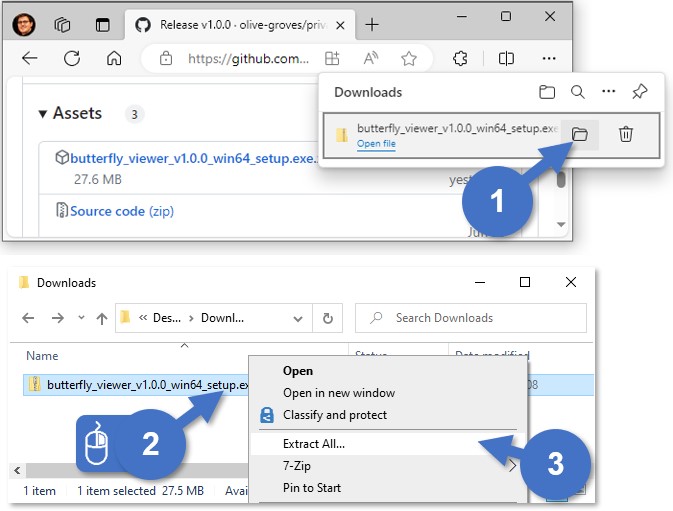
Extract butterfly_viewer_v1.y.z_win64_setup.exe from the ZIP:
- Go to the folder where you downloaded the ZIP.
- Right-click the ZIP.
- Select Extract All... or another extraction tool (like 7-Zip).
Run installer
Note: Your computer might block you from running the installer via double-click if you’re using a work computer or otherwise don’t have admin privileges:
- If you have no admin privileges, skip to Option 2.
- If you indeed have admin privileges, just follow Option 1.
Why is it unrecognized and blocked? In short, it’s because this installer has no certificate. If an installer's certificate isn't found by Windows when double-clicked, Windows will block it from immediately running.
Installer option 1: With admin privileges
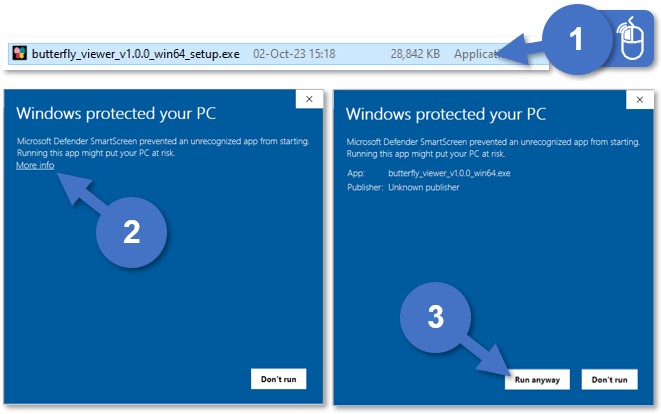
If you have admin privileges, run the installer by double-clicking on butterfly_viewer_v1.y.z_win64_setup.exe:
- Double-click on
butterfly_viewer_v1.y.z_win64_setup.exe. - Windows Defender SmartScreen may show a pop-up. If not, skip to step 5.
- Select More info.
- Select Run anyway.
No Run anyway? Select Don't run and try Option 2. - Wait for the installer to load. This may take a few seconds.
Installer option 2: Without admin privileges
If double-clicking the installer doesn’t work, run the installer via the command prompt.
Not possible? You can try installing on a virtual machine or contacting your machine admin.
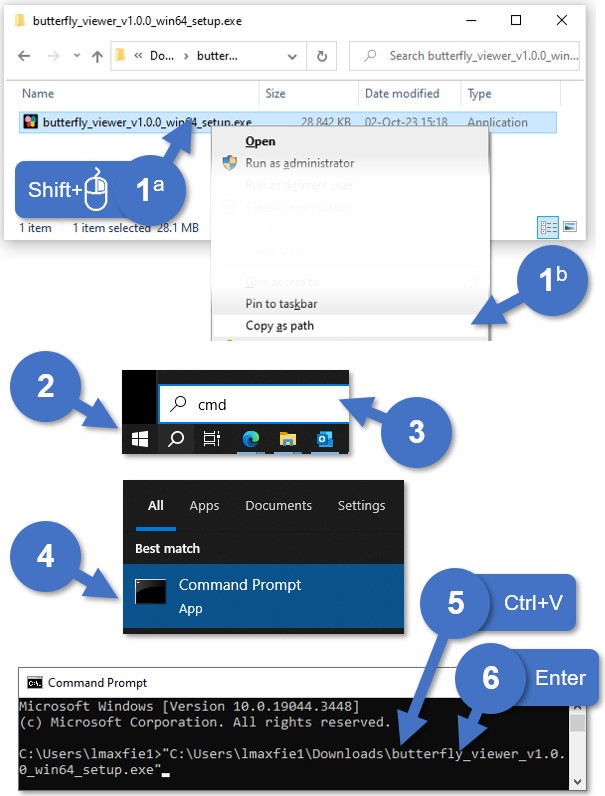
You can find various ways online on how to run an executable (EXE) via the command prompt, but I prefer these steps:
- Copy the path of the installer:
- Press and hold the
Shiftkey and then right-click the file. Wait for the menu to load. - Select Copy as path.
- Press and hold the
- Open the Start menu (
⊞ Win). - Type cmd.
- Press the
Enterkey or select the Command Prompt app. - Paste into the prompt the installer path you copied with
Ctrl·V. - Run by pressing
Enter. - Wait for the installer to load. This may take a few seconds.
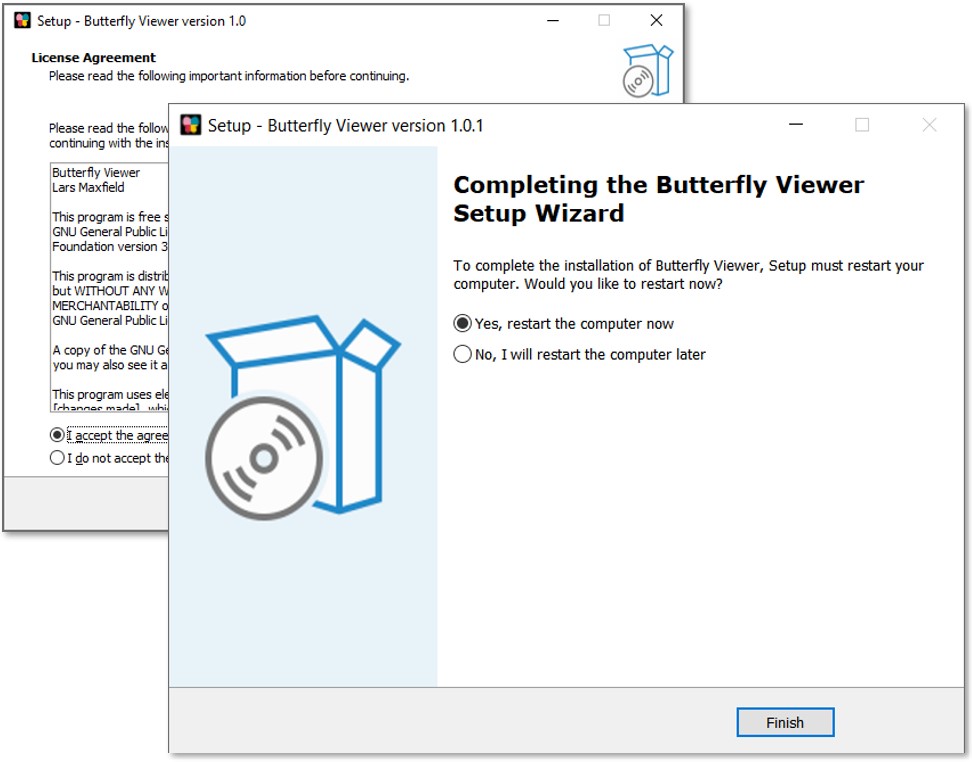
Follow installer steps and install
Once the installer loads, follow the onscreen steps to install the Viewer:
- Accept the agreement. The license is GNU GPL v3.0↗ or later.
- Choose the install folder. The default should be ok.
*Updating with a newer version? First uninstall the old version and then re-run the new installer.
- Choose the Start Menu folder. The default should be ok, but you don't need to create a Start Menu folder to use the app.
- Choose to create a desktop shortcut. This can be useful to have.
- Install.
- Restart. Restart recommended to avoid issues with drag-and-drop not working.
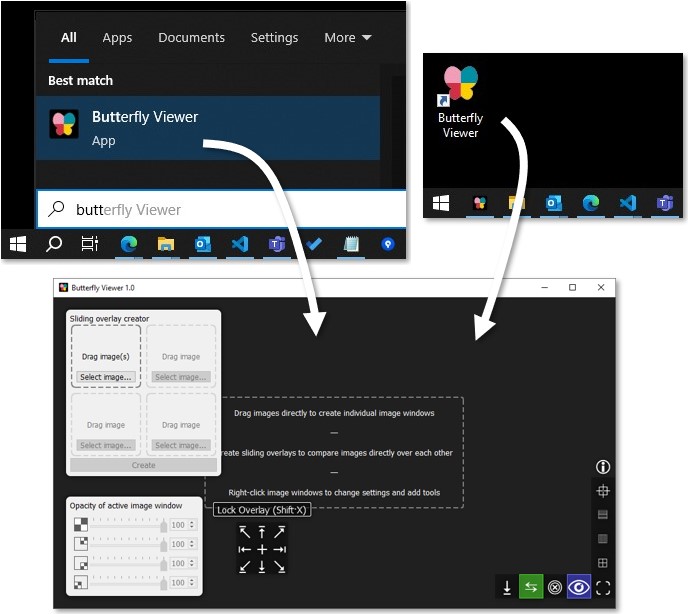
Run
To run the Viewer, search for Butterfly Viewer in the Start menu (⊞ Win) or double-click on the desktop shortcut if you added it upon install.
Follow the tutorial to learn the Viewer's features.
Uninstall
You can uninstall the Viewer executable from Windows by going to Add or remove programs via the Start menu, selecting Butterfly Viewer, and then selecting Uninstall.
macOS app
Download:
butterfly_viewer_v1.y.z_macOS.app.zip↗110 MB installed
For macOS, Butterfly Viewer installs to your computer with an app file which you drag into Applications. The Viewer can then be started directly from Launchpad.
Prerequisites
MacOS High Sierra is used to create the macOS app, so versions 10.13.6 and newer should be supported.
Other prerequisites are the same as the Windows executable.
Download ZIP
Download the Viewer from the latest release of the Viewer's GitHub repo, which is packaged as an app under Assets as butterfly_viewer_v1.y.z_macOS.app.zip↗.
Here v1.1 is shown, but you should download the latest version.
Add to Applications and Launchpad
These steps are necessary to run Butterfly Viewer directly from Launchpad:
In Finder, go to Downloads. If not already unzipped, unzip the ZIP by double-clicking the file.
Drag
Butterfly Viewerinto Applications.Go to Applications (not Launchpad).
In Applications, control-click (right-click) on Butterfly Viewer, then click Open.
A warning will likely pop up from Apple saying it can't be checked. Click Open anyway.
Using macOS Sequoia 15? Follow Apple's instructions for opening a Mac app from an unknown publisher.
Why? In short, it’s because this app has no certificate.
Run
To run the Viewer, open Launchpad and click on Butterfly Viewer.
Uninstall
You can uninstall the Viewer app from macOS by going to Applications and dragging Butterfly Viewer to Trash.
Python
Butterfly Viewer also runs directly on its Python source code, available from its GitHub repo↗:
python butterfly_viewer.py
Requirements
The list of dependencies are in environment.yml in the root directory, which includes:
- Python 3.6 (tested with Python 3.6.13)
- PyQt 5.9 (tested with PyQt 5.9.2)
- piexif
Install and run
There are a couple ways to run the Viewer with Python. Here's one way using conda (anaconda.org↗):
- Clone Butterfly Viewer from its GitHub repo↗ or simply download the source code as a ZIP and extract it.
- Note the root directory
C:\path\to\the\butterfly_viewer\. Open Anaconda Prompt and change the directory to the root directory.
cd C:\path\to\the\butterfly_viewer\If using Windows, create a new conda environment in a new subfolder named
envusing theenvironment.ymlfile from the root directory.conda env create --file environment.yml --prefix ./envIf using macOS or Linux, create a new conda environment named
envmanually:conda config --append channels conda-forge conda create --prefix ./env python=3.7 conda activate ./env conda install pyqt=5.9 conda install piexifActivate the
envenvironment.conda activate ./envChange directory to the source subfolder.
cd butterfly_viewerRun Butterfly Viewer.
python butterfly_viewer.py
Tutorial
Sample images:
butterfly_images-1.0.zip↗ · 121 MBCredits: Van Gogh Museum, Amsterdam (Vincent van Gogh Foundation) · 133 MB extracted
This tutorial guides you through the Butterfly Viewer's main features using a stack of sample technical images of Vincent van Gogh's Small Pear Tree in Blossom.
Download sample Van Gogh images
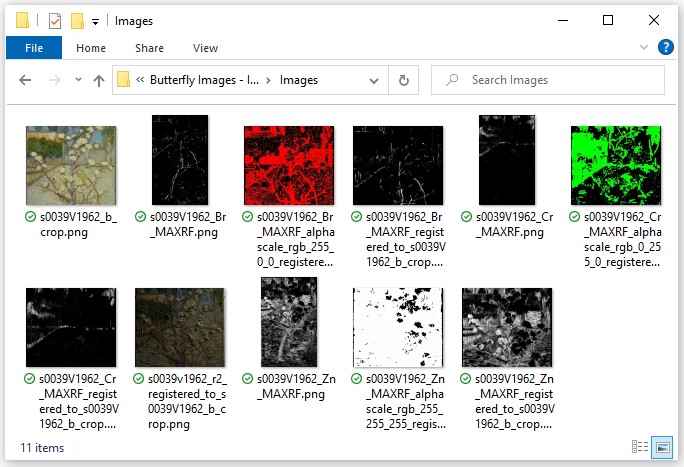
Download the ZIP of sample technical images↗ (121 MB) of Small Pear Tree in Blossom by Vincent van Gogh, with credits to the Van Gogh Museum, Amsterdam (Vincent van Gogh Foundation).
Extract the ZIP and open the folder of images. How to: Extract a ZIP
Synchronized side-by-side images
Synchronized pan and zoom
Let's compare individual images side-by-side with synchronous movement and discover some basic features of the Viewer along the way.
First, start the Viewer.
- If you installed the Windows executable, search for Butterfly Viewer in the Start menu (
⊞ Win) or double-click on its desktop shortcut.
How to: Run installed executable - If you're using Python, execute
python butterfly_viewer.
How to: Run on Python

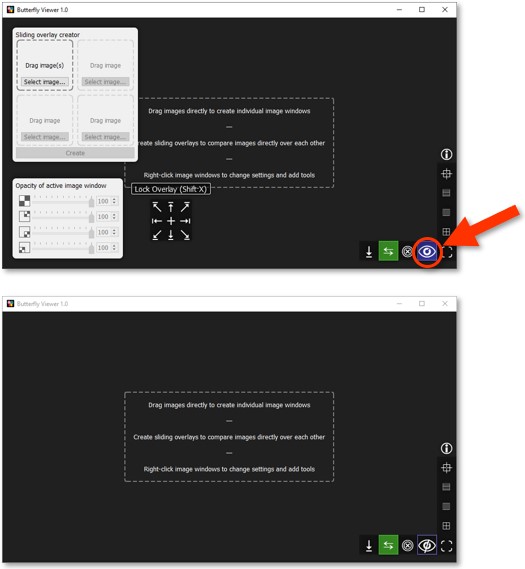
We can hide the advanced features on the left because we're doing simple image comparison.
Hide the interface by clicking  .
.
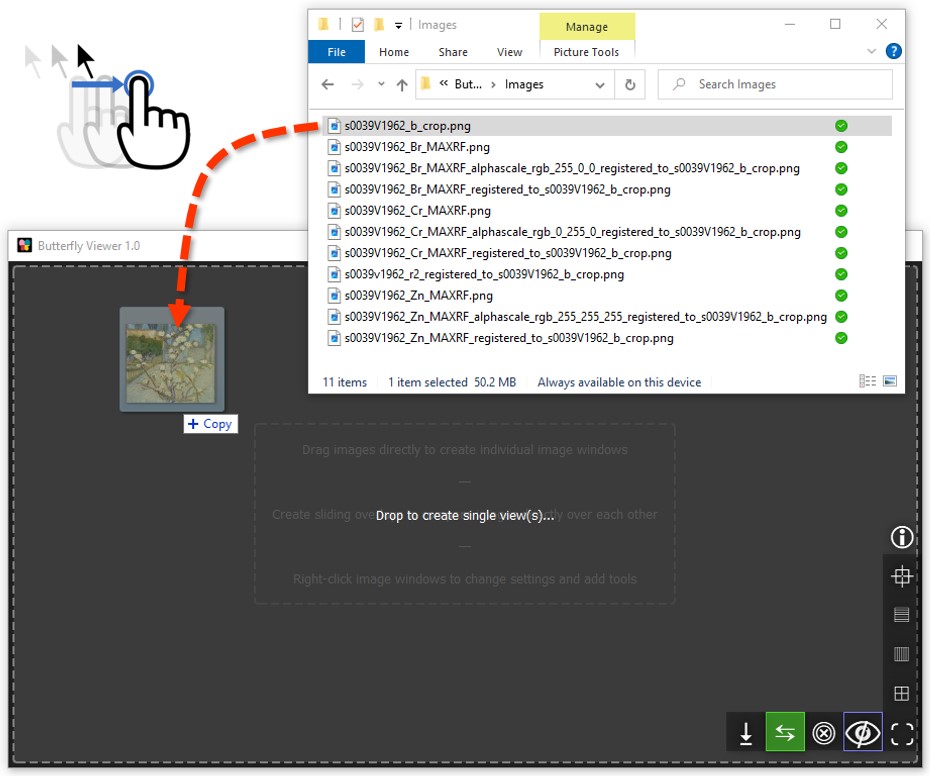
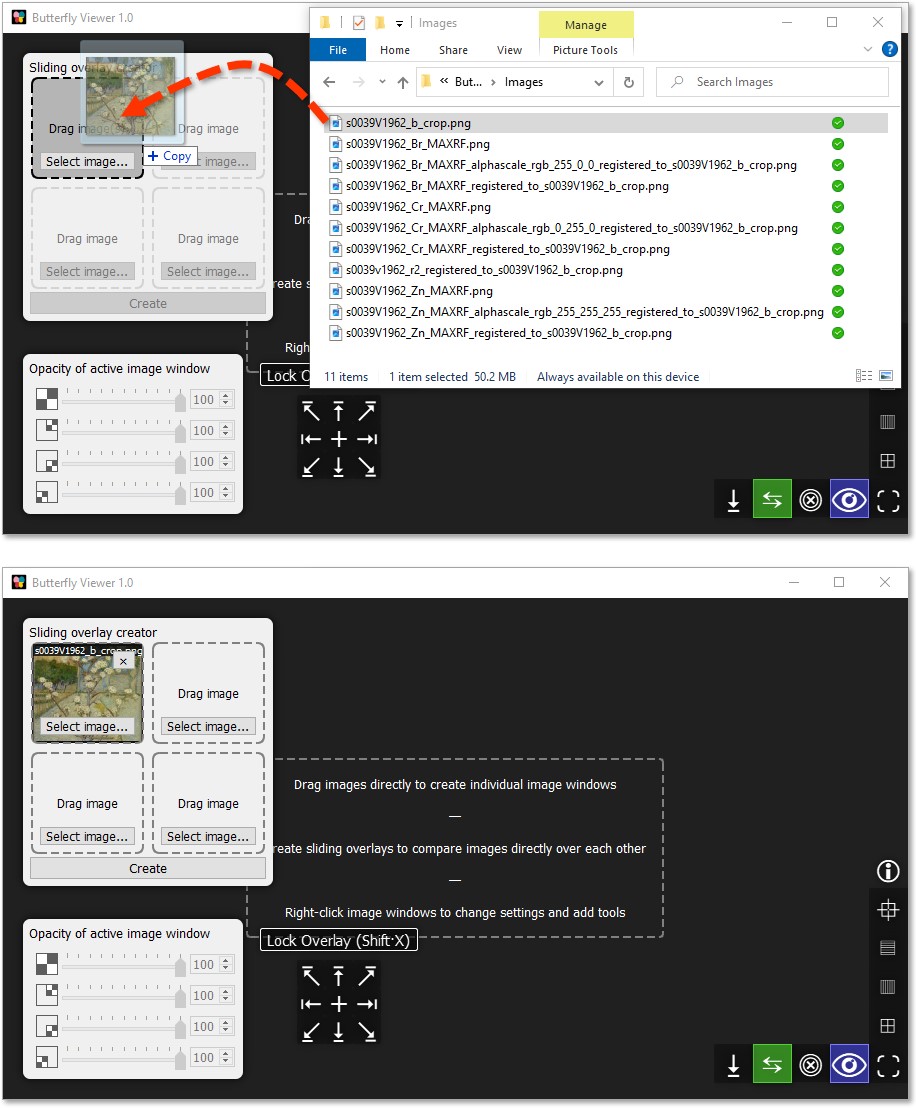
Let's add our first image: the color photograph of Small Pear Tree in Blossom.
Click and drag s0039V1962_b_crop.png from the sample images folder into the Viewer’s main area.
Drag-and-drop not working? Try restarting your computer and reopening the Viewer.
Some users report this solves issues with images not being droppable.
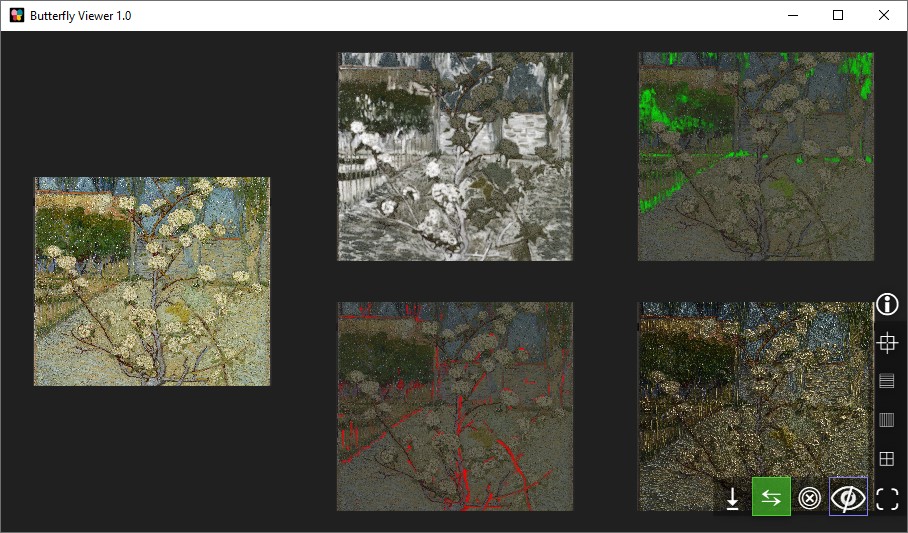
Now let's add two more images to compare them: a raking light photograph and a zinc element map created using X-ray fluorescence mapping.
Click and drag these files into the Viewer:
s0039v1962_r2_registered_to_s0039V1962_b_crop.png; ands0039V1962_Zn_MAXRF_registered_to_s0039V1962_b_crop.png.
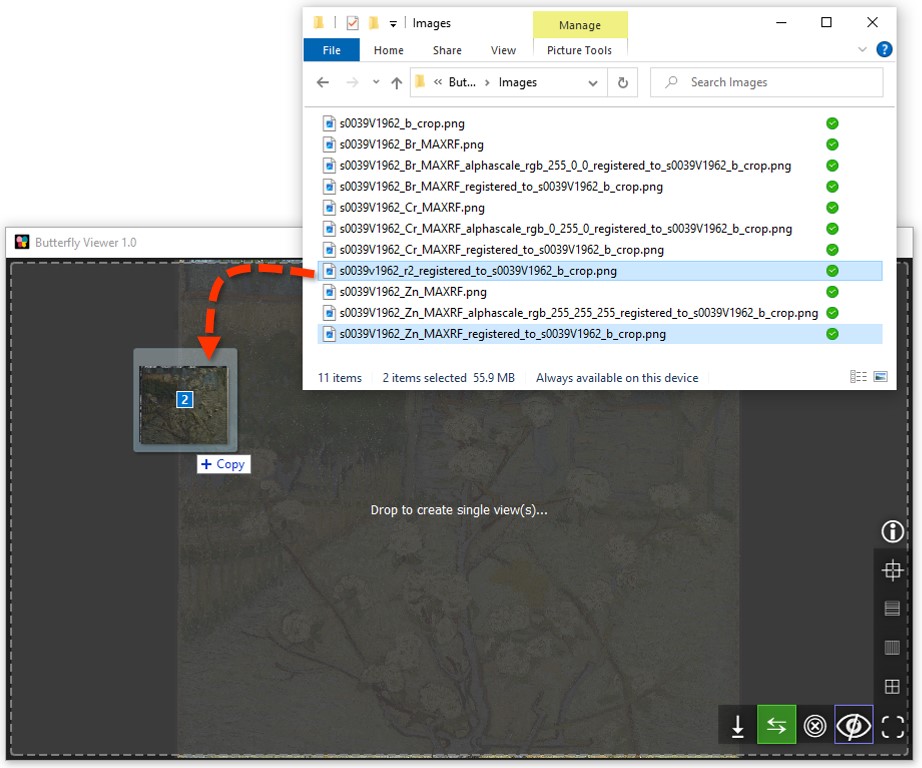
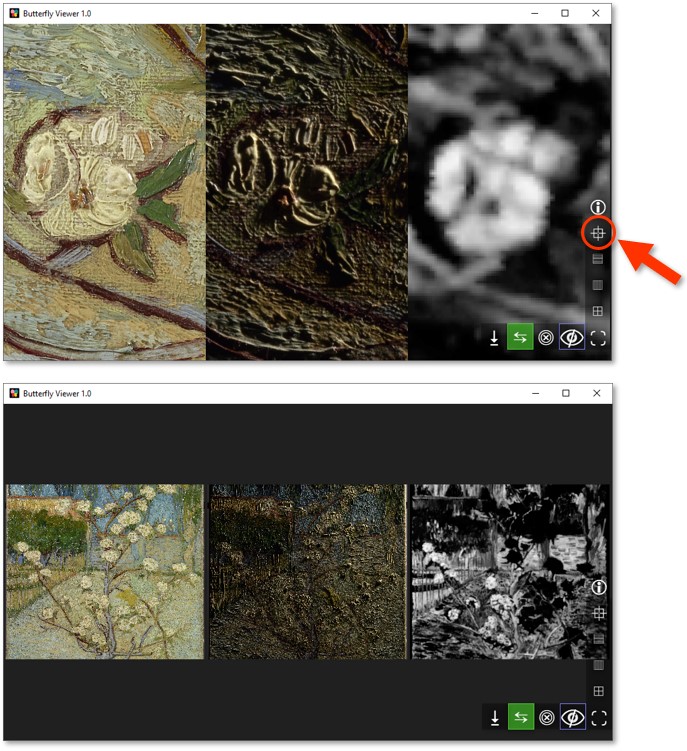
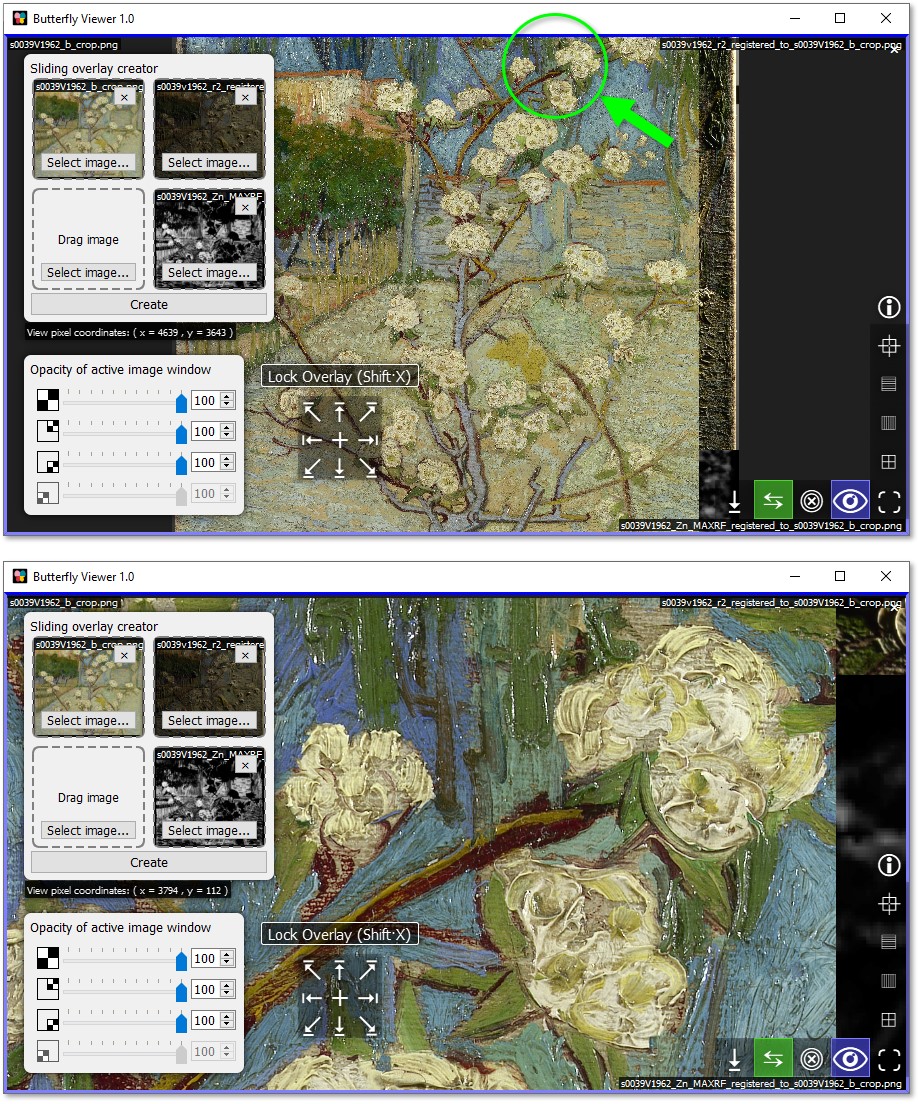
Clicking and dragging image files directly into the Viewer creates an individual image window for each image and automatically arranges them side-by-side.
Images are arranges horizontally (left to right) by default, but you arrange them vertically or as a grid using the interface buttons on the bottom right of the Viewer.
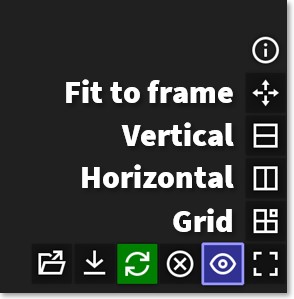 .
.
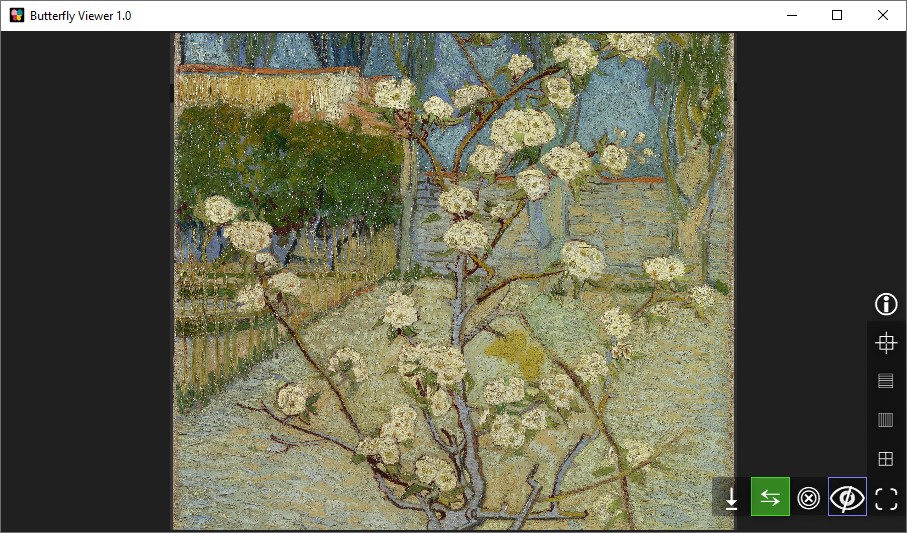
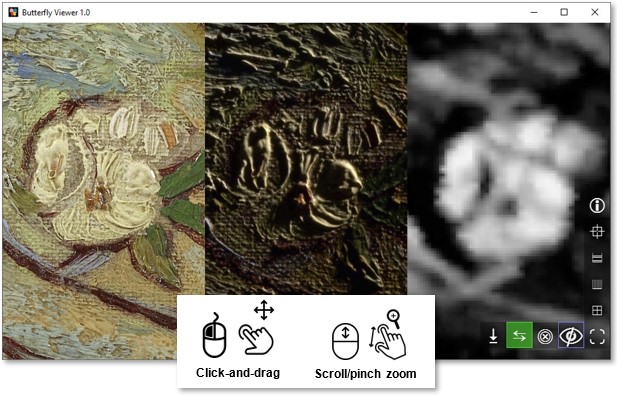
Zoom (scroll) and pan (left-click drag) to explore the images synchronously.
Can you find this specific blossom in the pear tree?
Try the shortcut to center and fit the image windows by clicking  .
.
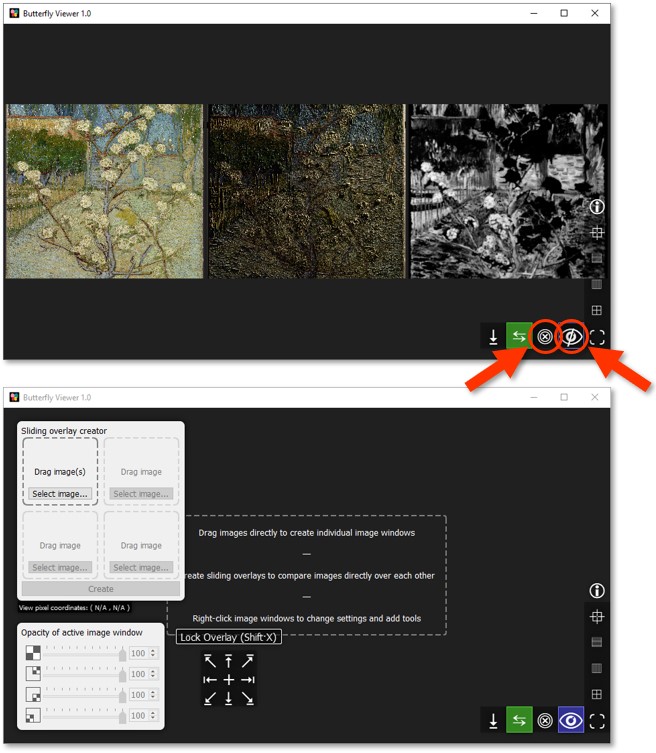
Once you're done exploring the images, close them and unhide the interface.
Close all image windows with  .
.
Show the interface with  .
.
Sliding overlays and opacity sliders
Sliding overlays
Now let's use sliding overlays to compare the sample images we viewed side-by-side in the previous section. We'll also reveal opacity sliders and other features of the Viewer.
First, make sure the Viewer is started with the interface showing.
The 2×2 interface in the top-left corner of the Viewer lets us create an image window with a sliding overlay.
The concept of a sliding overlay is like a before-and-after slider but in two dimensions, allowing us to place up to three images over a base image and compare their contents all at the same point by sliding the cursor up, down, left, and right.
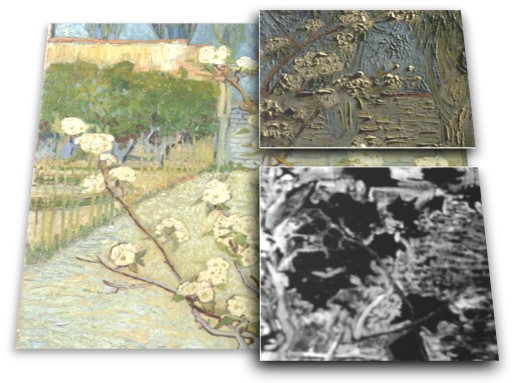
For the base image of our first sliding overlay, we'll use the color photograph of Small Pear Tree in Blossom. This acts as a "ground truth" with which we can compare overlaid images.
Drag and drop s0039v1962_b_crop.png from the sample images into the top-left tile of the sliding overlay creator.
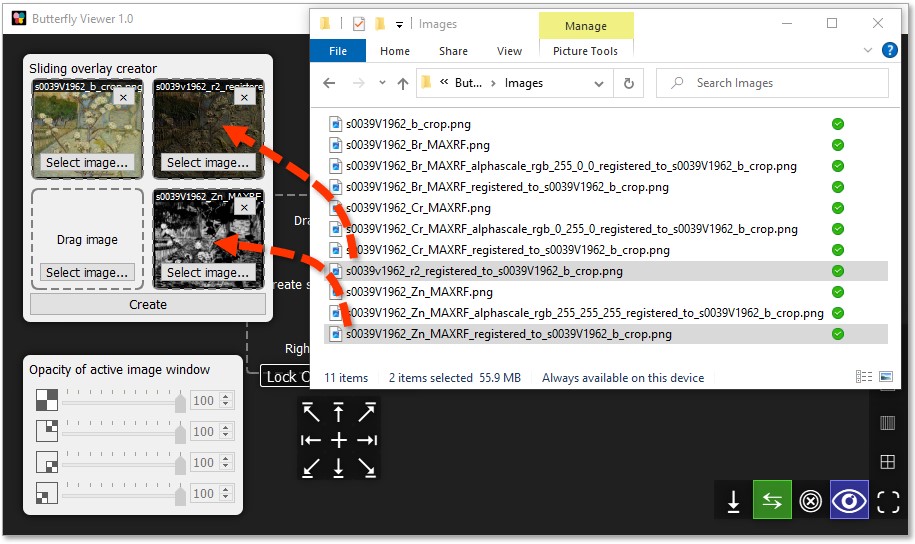
The other tiles in the creator are now unlocked because a base image is present, so let's add the raking light photograph and a zinc element map.
Individually click and drag these files into the creator:
- top-right tile:
s0039v1962_r2_registered_to_s0039V1962_b_crop.png; and - bottom-right tile:
s0039V1962_Zn_MAXRF_registered_to_s0039V1962_b_crop.png.
To accurately compare images with a sliding overlay in the Viewer, those images must already be registered with one another. That means their aspect ratios must match, and the features within those images must be aligned.
The sample images here are already registered. If you want to easily create registered copies of your own images, check out Butterfly Registrator↗.
Now we can create a sliding overlay using the files we added.
Click Create to generate an image window with a sliding overlay.
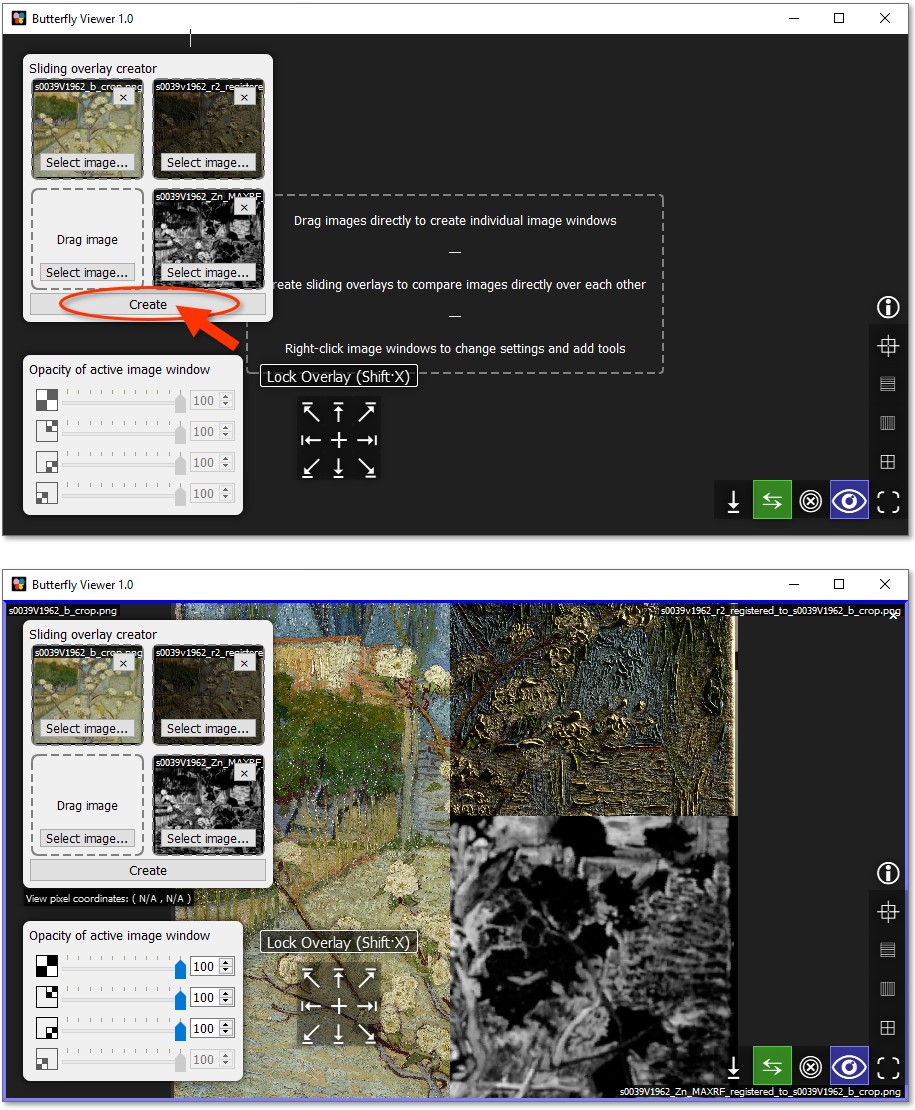
Move your cursor across the window to change the position of the "split" of the sliding overlay.
The split is unlocked by default, meaning it will continuously follow your cursor.
Zoom to the blossoms in the top-right of the pear tree.
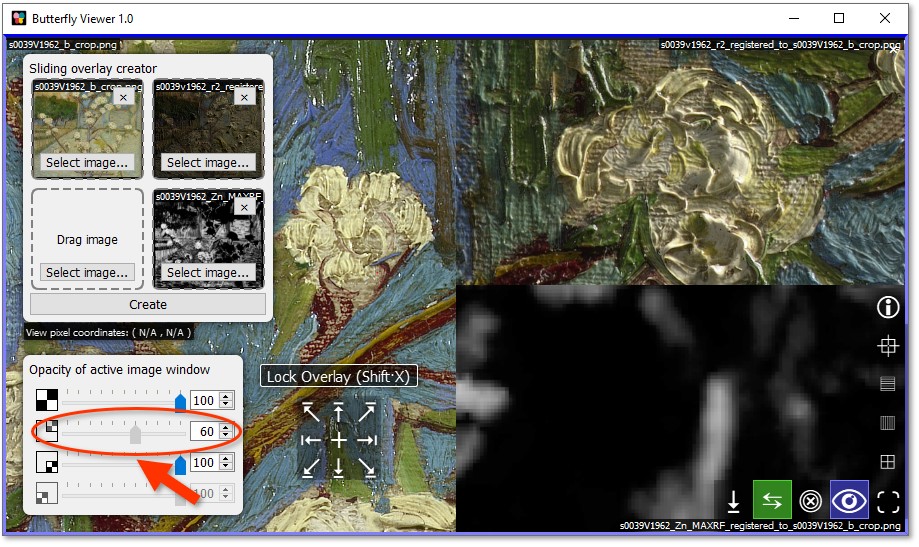
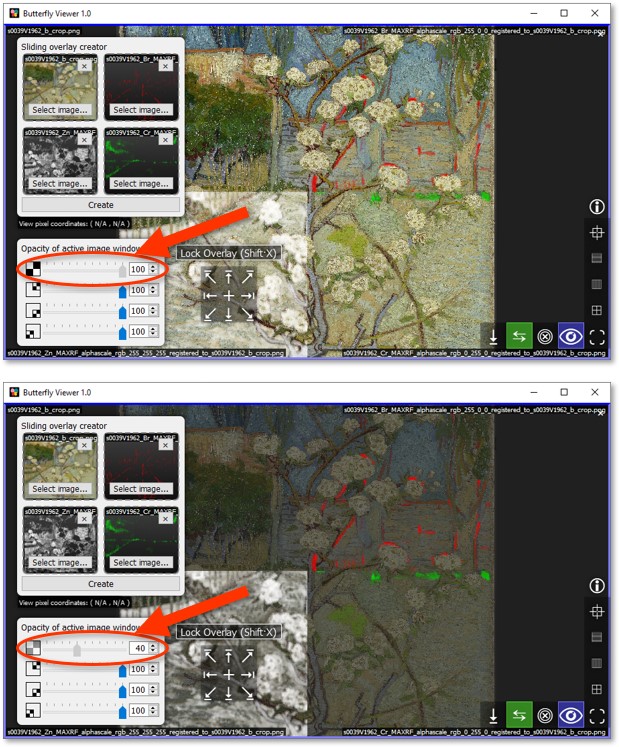
The sliders in the interface in the bottom-left corner of the Viewer let us adjust the opacities of the active sliding overlay.
Since the raking light image is directly over the base color image, we can blend in the color image by decreasing the opacity of the raking light image. In other words, we can make the raking light image semi-transparent and let in the color image underneath.
Drag the opacity slider of the top-right image to about 60%.
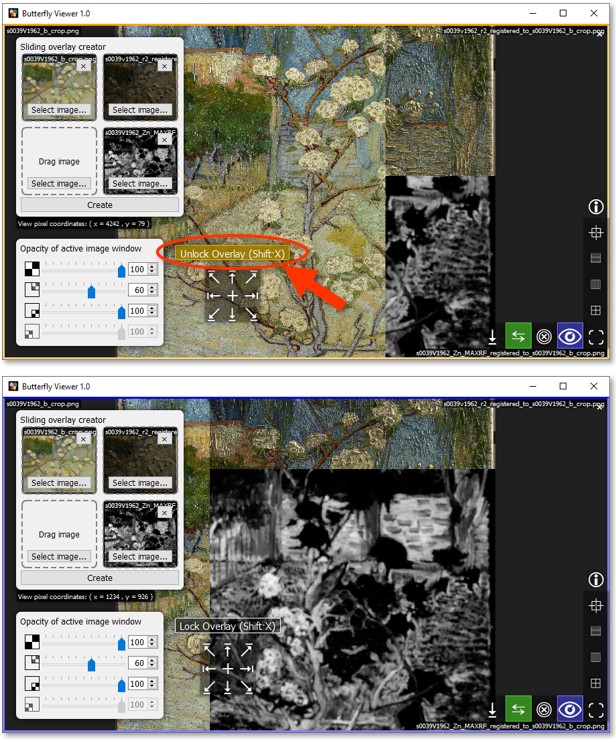
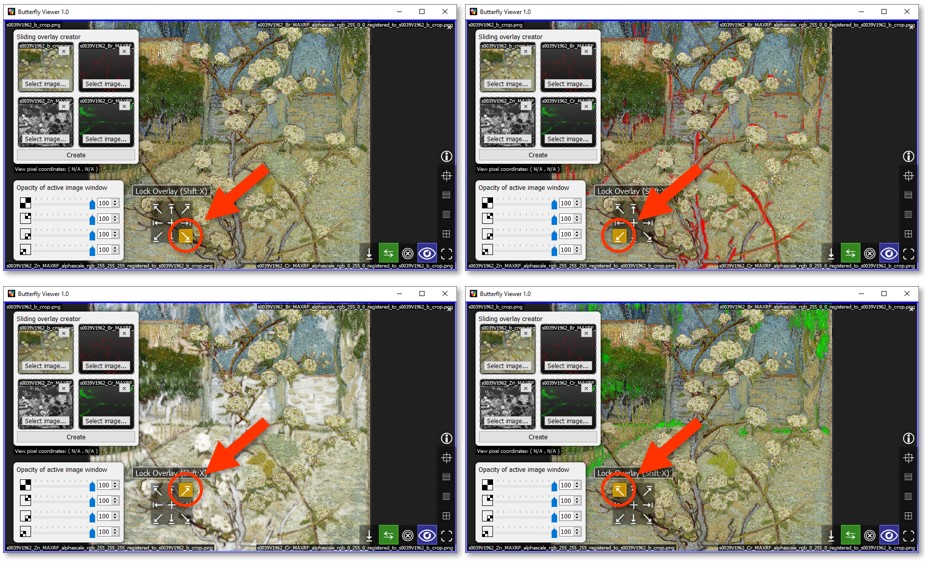
To more easily examine the blended images, we can lock the split of the sliding overlay.
First, pan and zoom the window such that you can place the cursor at the bottom-left the brick wall.
Lock the split at the cursor position by pressing Shift·X on your keyboard.
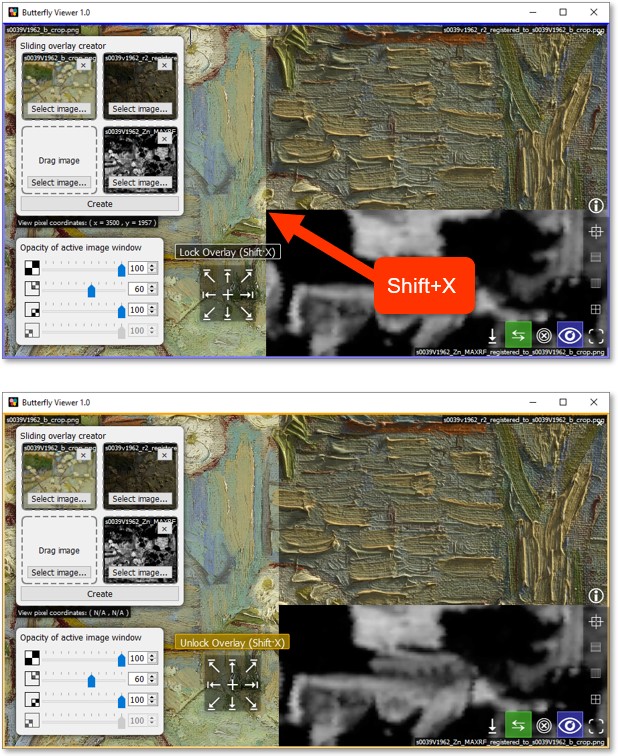
Pan and zoom to the brick wall.
Again move the opacity slider of the top-right image, this time left and right to reveal the brush strokes of Van Gogh.
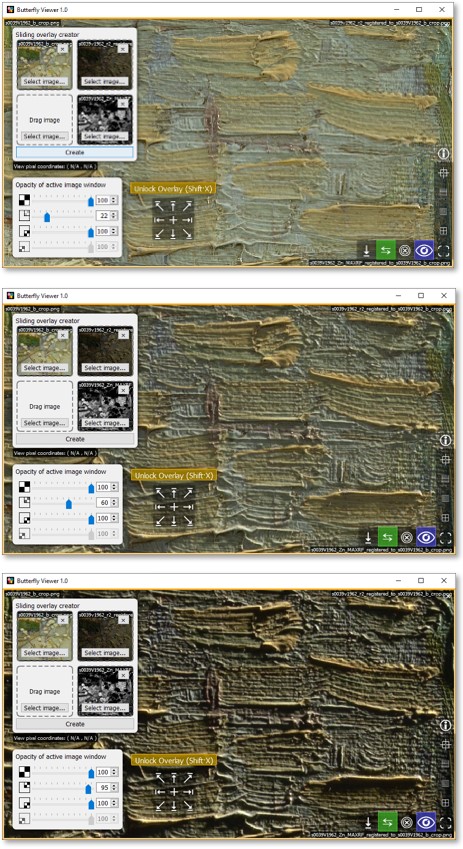
Fit and center the image window.
Unlock the split by pressing Shift·X or by clicking Unlock Overlay.
You can also try blending the zinc element map with the color image using the opacity slider, though in the next section we'll instead use alphascale versions of the element maps (not grayscale versions) to better visualize them over the color image.
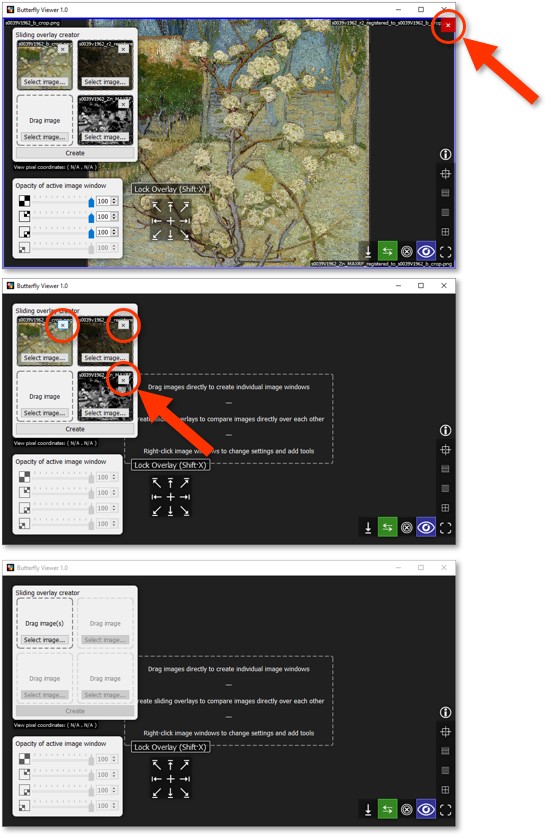
Close the image window of the sliding overlay with X in the top-right corner.
Clear the tiles of the sliding overlay creator with their respective X.
Alphascale maps with sliding overlays
Alphascale maps in a sliding overlay
Here we're going to use alphascale versions of the XRF element maps to better compare them with the color photo of Small Pear Tree in Blossom. We'll use a sliding overlay as in the previous section, and also cover some more features of the Viewer.
First, make sure the Viewer is started with the interface showing.
We'll again use the color photograph of Small Pear Tree in Blossom as the base image of the sliding overlay.
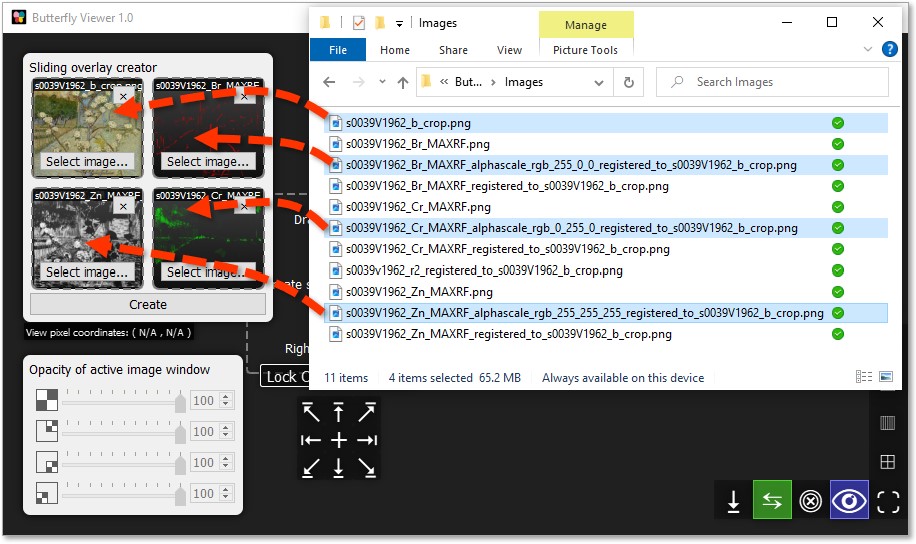
Then we'll add the alphascale versions of the bromine, chromium, and zinc element maps included in the sample images.
Alphascale is a term we use to refer to a grayscale image converted such that the transparency of each pixel (the alpha channel) is proportional to how black or white the original grayscale pixel is. Details here. Use the alphascale creator in Butterfly Registrator to convert your own grayscale maps to alphascale.
Individually click and drag these files into the creator, and then click Create:
- top-left (base) tile:
s0039V1962_b_crop.png; - top-right tile:
s0039V1962_Br_MAXRF_alphascale_rgb_255_0_0_registered_to_s0039V1962_b_crop.png; - bottom-right tile:
s0039V1962_Cr_MAXRF_alphascale_rgb_0_255_0_registered_to_s0039V1962_b_crop.png; and - bottom-left tile:
s0039V1962_Zn_MAXRF_alphascale_rgb_255_255_255_registered_to_s0039V1962_b_crop.png.
If you want to quickly see each element map as a whole over the color image, you can use the interface grid of buttons in the bottom-left of the Viewer to temporarily move the sliding overlay to the edges of the image window.
Hover over (don't click!) the split shortcut arrows to temporarily move the split.
By reducing the opacity of the base color image — in other words, by making the base image semi-transparent — we can make the colors of the alphascale maps "pop" and as a result make it easier to see where their respective elements are present in Small Pear Tree in Blossom.
Drag the opacity slider of the base image to about 40%.
Can you find this area in the painting?
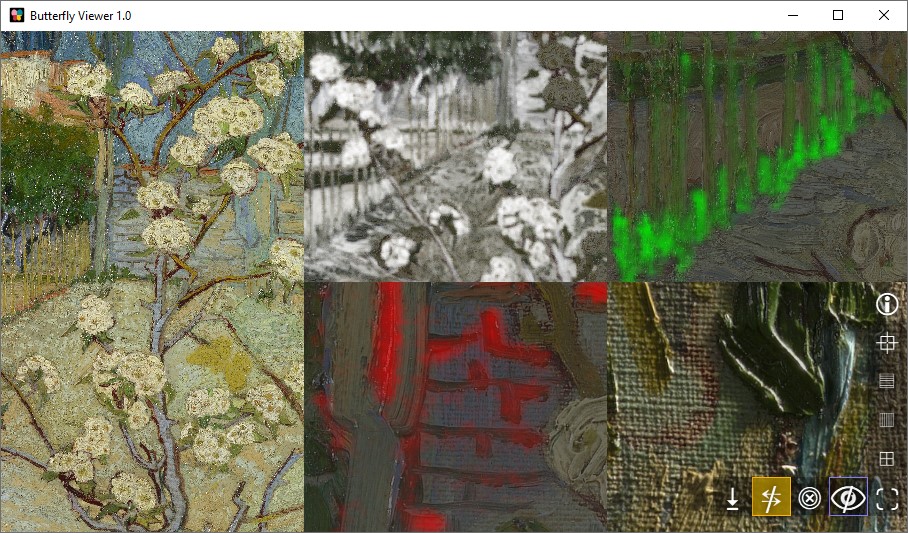
The Viewer can handle multiple simultaneous image windows with individual images and sliding overlays, all while synchronizing panning and zooming.
Try out other handy features of the Viewer:
- Toggle sync on/off with
 .
. - Go fullscreen by pressing the
Fkey or with .
. - Copy a screenshot to your clipboard with Ctrl·C or save it as an image with
 .
. - Explore other settings and tools by right-clicking an image window.
Lastly, can you create a set of image windows like this?
Once finished, close the Viewer — or explore it further using your own images!
Set zoom synchronization mode
Zoom can be synchronized by one of four modes by right-clicking an image and selecting the mode under Sync zoom by:
Fit in a box (default): images are scaled to fit to the same sized square box.
Width: images are scaled to appear equally as wide.
Height: images are scaled to appear equally as tall.
Pixel (relative size): images are not scaled whereby pixels between images are the same size.
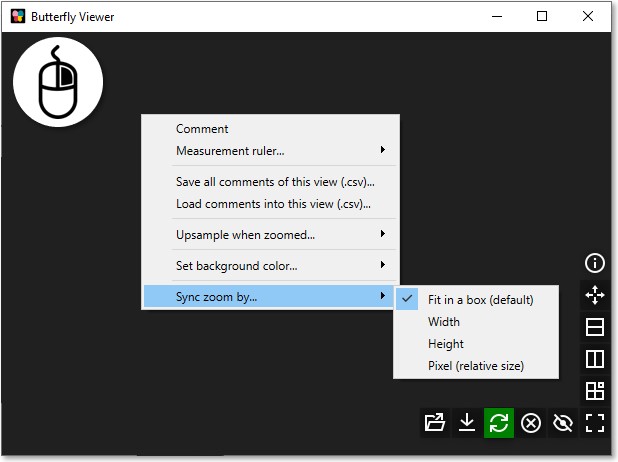
Sliding overlays scale their non-base images using the fit-in-a-box method.
Common questions
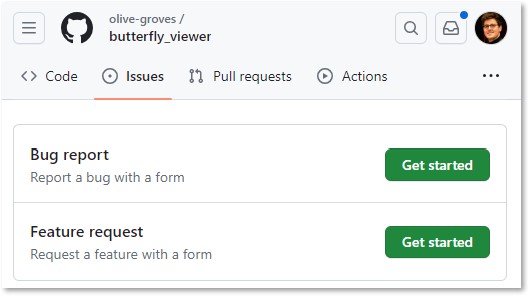
Report a bug?
You can submit a bug report↗ as an issue on the Viewer's GitHub.
Request new feature?
You can submit a feature request↗ as an issue on the Viewer's GitHub.
Seeing pixelated images?
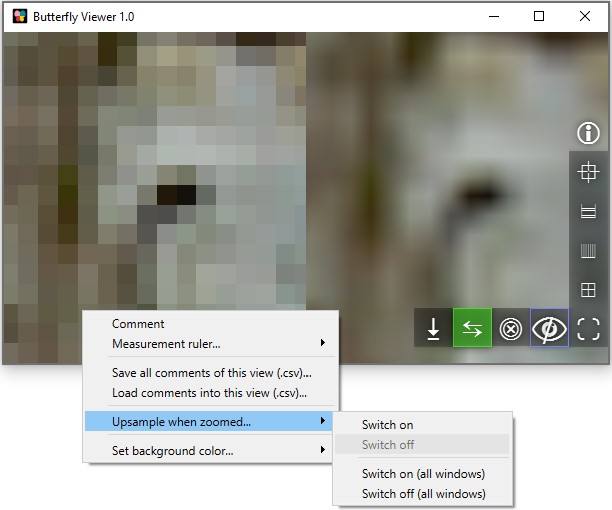
By default, the Viewer does not smooth the pixels of images when you overzoom them. Smoothing is turned off to show you precisely where individual pixels are, which is otherwise difficult to do with it on. As a result, this can cause images to appear pixelated — which is true, because you're seeing the exact pixels.
You can toggle smoothing (upsampling) through the right-click menu on any image window.
What is alphascale?
Alphascale is a term we use to refer to a grayscale image converted such that the transparency of each pixel (the alpha channel) is proportional to how black or white the original grayscale pixel is. The color of each pixel in the alphascale image is then set to the same color, like white or red.
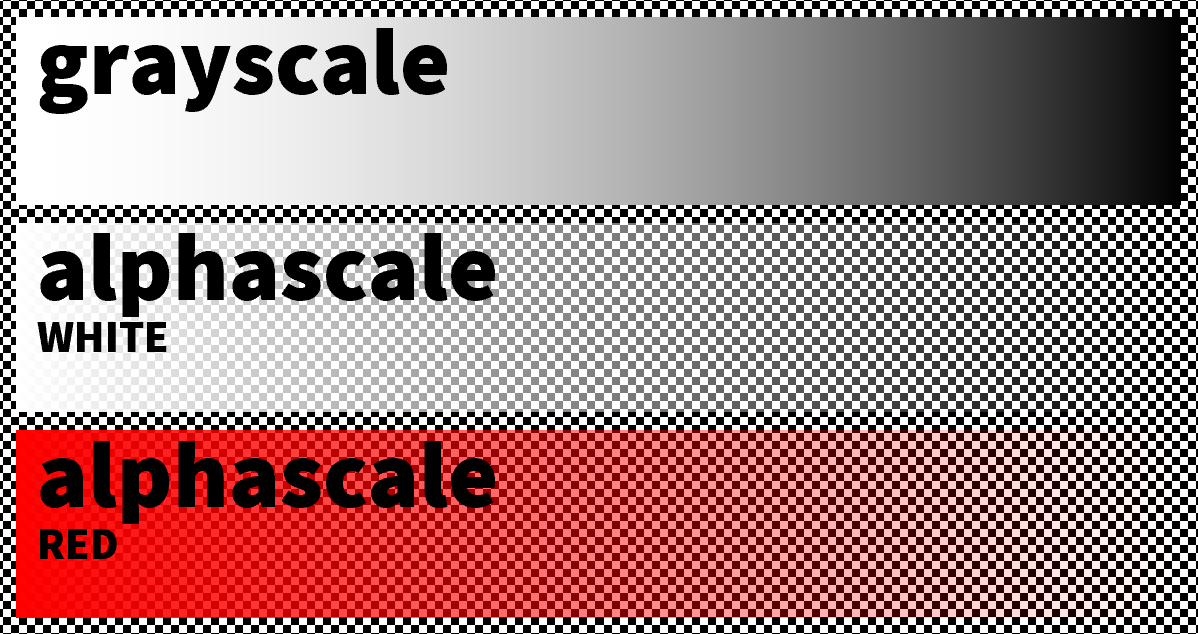
For grayscale XRF maps converted to alphascale, this means the transparency represents the presence of an element: an opaque (non-transparent) pixel indicates the highest relative presence, whereas a see-through (transparent) pixel indicates the lowest relative presence. In other words, where in an 8-bit grayscale map white is high (255) and black is low (0), in its alphascale counterpart fully opaque is high (alpha=255) and fully transparent is low (alpha=0).
If you want to create alphascale versions of your own grayscale maps, check out Butterfly Registrator↗.
Developers
Contributing to butterfly_viewer
You can contribute to butterfly_viewer with a pull request by following these steps:
- Fork the repo↗.
- Create a branch:
git checkout -b <branch_name>. - Make your changes and commit them:
git commit -m '<commit_message>' - Push to the original branch:
git push origin <project_name>/<location> - Create the pull request.
Or see the GitHub documentation on creating a pull request↗.
Adding and changing icons
To add or change icons (like SVG files) to Viewer, you need to add them first to a resources file following these steps:
- Add/change the files in
butterfly_viewer/icons - Add/change the corresponding files in
icons.qrc - In Anaconda Prompt:
- Activate the standard
./envenvironment - Change directory to the source code
butterfly_viewer - Run
pyrcc5 icons.qrc -o icons_rc.py
- Activate the standard
- Update the code referencing the icons
Creating the executable and setup installer
The installer executable for Butterfly Viewer is created by first bundling the app with PyInstaller and then creating a setup installer with Inno Setup.
Install PyInstaller
PyInstaller must be installed with the same packages as the environment of the Butterfly Viewer to bundle a functioning dist and executable.
With conda you can do this by cloning the environment you use for Viewer, activating that clone, and then installing PyInstaller.
Cloning from env subfolder
If you use an env subfolder in the root of butterfly_viewer for your Viewer environment, first open Anaconda Prompt and change the directory to the root directory.
cd C:\path\to\the\butterfly_viewer\
Clone the environment into a new subfolder named env_installer, using the full directory of env in the command.
conda create --prefix ./env_installer --clone C:\path\to\the\butterfly_viewer\env
Activate the environment.
conda activate ./env_installer
Cloning from environment.yml
You can also create and activate a clone of the environment directly from the environment.yml in the root directory of butterfly_viewer:
into a subfolder;
conda env create --file environment.yml --prefix ./env_installer
conda activate ./env_installer
or in a new named environment.
conda env create --file environment.yml --name viewer_installer
conda activate viewer_installer
Install
With the installer environment activated, install PyInstaller:
conda install pyinstaller
Run PyInstaller to bundle Butterfly Viewer
Run PyInstaller with the following command while in the source code directory \butterfly_viewer\butterfly_viewer.
Windows:
pyinstaller --onedir --windowed --icon=icons\icon.ico butterfly_viewer.py
macOS:
pyinstaller --windowed --icon=icons/icon.icns butterfly_viewer.py
PyInstaller not working? Make sure you've changed directory to the source code directory (the subfolder
butterfly_viewerwithin the repo itself).
The executable runs fastest when not bundled into one file (otherwise it needs to unpack all packages on each startup), so we enforce the default --onedir. We also enforce --windowed to prevent the console window from opening when the executable runs. We add the app icon with the --icon argument.
Use Inno Setup to create a setup installer
Steps to use Inno Setup are not yet documented.
Generating documentation with pdoc
The docs branch is exclusively for generating documentation with pdoc.
In other words, it is a one-way street to docs: only pull main into docs; never pull docs into main.
Note: We use pdoc, not pdoc3.
0. Pull main into docs
Bring the latest code into the docs branch with a pull request main>docs.
1. Checkout docs branch
Checkout the docs branch.
2. Open conda and change directory to the root folder of butterfly_viewer
cd C:\butterfly_viewer
3. (If not yet done) Install docs environment
Install the docs environment with conda using environment_docs.yml, which is a modified version of the Butterfly Viewer's base environment with pdoc and Python 3.7 (which is required for pdoc). This .yml is available in the docs branch. :
conda env create -f environment_docs.yml --prefix ./env_docs
4. Add "Returns" to pdoc Google docstring sections
pdoc does not include Returns in its list of section headers for Google's docstring style guide. This means the returns are not styled like those under Arguments.
To give that styling to returns, do this:
- Locate
docstrings.pyin the pdoc site package which installed with the docs environment, likely here:
...\env_docs\Lib\site-packages\pdoc\docstrings.py
- Add
"Returns"to the list variableGOOGLE_LIST_SECTIONS, which is around line 80 or so.
GOOGLE_LIST_SECTIONS = ["Args", "Raises", "Attributes", "Returns"]
- Save
docstrings.py
5. Activate docs environment
conda activate ./env_docs
6. Add to path the butterfly_viewer source folder
set PYTHONPATH=C:\butterfly_viewer\butterfly_viewer
7. Change directory to source folder
cd butterfly_viewer
8. Run pdoc
Run pdoc with the following command while in the source code directory \butterfly_viewer\butterfly_viewer:
pdoc C:\butterfly_viewer\butterfly_viewer -t C:\butterfly_viewer\docs\_templates --docformat google --logo https://olive-groves.github.io/butterfly_viewer/images/viewer_logo.png --logo-link https://olive-groves.github.io/butterfly_viewer/ --favicon https://olive-groves.github.io/butterfly_viewer/images/viewer_logo.png -o C:\butterfly_viewer\docs\
You will need to edit the full directory of the repo in the above pdoc command (
C:\butterfly_viewer\...) to match that on your machine.
We call the custom templates folder with -t. We enforce the google docstring format with --docformat. We add the webpage logo and favicon with --logo and --favicon. We export the docs to the docs subfolder with -o.
9. Commit and push
Commit and push the updated docs to the docs branch.
10. Un-checkout docs branch
Continue development only after having un-checked out of the docs branch.
Multi-line commands
You can re-run pdoc by copying and pasting the following lines together (steps 2 and 5–8), making sure to replace the absolute paths with those of the repo on your own machine:
cd C:\butterfly_viewer
conda activate ./env_docs
cd butterfly_viewer
set PYTHONPATH=.
pdoc C:\butterfly_viewer\butterfly_viewer -t ../docs/_templates --docformat google --logo https://olive-groves.github.io/butterfly_viewer/images/viewer_logo.png --logo-link https://olive-groves.github.io/butterfly_viewer/ --favicon https://olive-groves.github.io/butterfly_viewer/images/viewer_logo.png -o ../docs
Updating packages in environment.yml
If you change the environment in order to an fix issue, add a feature, or simply reduce a dependency, you can update the packages in the environment.yml of the root by exporting the new environment while it is activated and then replacing that existing YML in the root:
conda activate NAME_OF_ENV

conda install/remove PACKAGE_1
conda install/remove PACKAGE_2
...
conda install/remove PACKAGE_N

conda env export > environment.yml
Take care to update both
environment.ymlandenvironment_docs.ymlin the branchdocs. If unable to do so, please create a GitHub issue requesting it be updated.
Credits
Butterfly Viewer is by Lars Maxfield.
Butterfly Viewer uses elements of @tpgit↗'s PyQt MDI Image Viewer (with changes made), which is made available under the Creative Commons Attribution 3.0 license.
Techniques and inspiration
Butterfly Viewer uses well-known image comparison techniques found in both commercial and free software, some of which helped inspire the Viewer itself.
Sliders and overlays
A sliding overlay is simply a before-and-after image slider in two-dimensions where the top-left image persists while the other three images are layed over it, hence the name "sliding overlay".
The underlying slider functionality is a commonly used method for comparing images as well as maps, videos, and other spatial information.
Adobe Lightroom
'Before and After' mode (video) (David Mark Erickson, 2016) and described in this blog post (Ashu Mittal, 2009)
OpenSeadragon
Programmable slider (demo) (Illya Moskvin, 2016 & 2021)
IIPMooViewer 2.0
'Multi-model overlays' (demo) (2011) with other demos
Georeferencer
Mouse-follow 'Swipe' mode (demo) and described in this documentation (2017)
Leaflet.Sync plugin for Leaflet
'Offset' mode (demo) with animation and available in its GitHub repo (2013)
The New York Times
Visual technique (video) (Steven Kurutz et al., 2024)
Affinity Designer
'Split-Screen View' mode (video) (Kezz Bracey, 2017)
3DVista
MapBrowser
'Swipe' in various ArcGIS apps
Minimal no-border 'Swipe' tool (video) (GIS Coordinated, 2018) with documentation (2005) and a compilation of apps with screenshots and links (Bern Szukalski, 2021–2023):
- ArcGIS Instant Apps (Media Map, Imagery Viewer, Atlas, Portfolio, Exhibit, Compare)
- App builders (Experience Builder, Web AppBuilder)
- Imagery apps (World Imagery Wayback, Sentinel-2 Land Cover Explorer, Landsat Explorer, Sentinel Explorer)
- ArcGIS StoryMaps
Synchronized panning and zooming
Adobe Lightroom
OpenSeadragon
Programmable syncing (demo) (Ian Gilman, 2017)
FastStone Image Viewer
'Compare' window (blog) (Joe Holler, 2009)
Georeferencer
'Grid' mode (demo) and documented here (2017)
Leaflet.Sync plugin for Leaflet
'Dual' mode (demo) (2013) and available in its GitHub repo
IIPMooViewer 2.0
'Dual synchronized streamed viewing' (demo) (2011) with other demos
GeTeach.com
BreezeBrowser Pro
'Compare images' window (documentation)
XnViewMP
'Compare' tool (forum) (2011) with screenshot
Constrain panning
OpenSeadragon
General user experience
OpenSeadragon, Blender, Adobe Lightroom, IIPMooViewer
Minimal and unobstructed viewport appearance with dark background and overall theme
Windows 10
Glowing square buttons in the Start menu
Microsoft Teams
Outline around video panel to indicate who is talking during a call
License
Butterfly Viewer is made available under the GNU GPL v3.0↗ license or later. For the full-text, see the LICENSE.txt file in the root directory of the Viewer's GitHub repo↗.